A practical guide to creating learning screencasts: part 3 – using desktop tools

Practical guidesIn part 1 of this guide, we looked at the arguments for screencasting. In part 2, we examined how best to work with simple, online, all-in-one-take tools. In this final part, we check out the more fully-featured desktop screencasting tools.

Choose a tool

Desktop screencasting tools have been around for well over a decade. Over time, two tools have emerged as clear front-runners – Adobe Captivate and Techsmith Camtasia. However, other tools can definitely do the job, including the free Wink. There are also much higher-end performance support tools as well as applications designed specifically to support screencasting for ERM systems such as SAP and Siebel.

What you can do with these tools

Desktop tools will give you much greater functionality than online tools. Whether you need this functionality or not only you can decide. For example, Camtasia will allow you to:

  • Record a webcam stream alongside the screencast. This feature requires some care, because it could just create visual noise.
  • Edit your screencast just like a video.
  • Record narration quite separately from the recording of the software demo.
  • Not use an audio narration at all, focusing instead on the use of text labels and highlights.
  • Share your output in a wide variety of ways including CD-ROM, a YouTube-ready format, or as an MP4 video for Apple mobile devices.
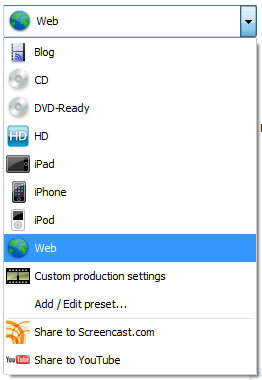
Camtasia output
Camtasia allows you to output to a wide range of formats, especially video

Although you can add interactivity to Camtasia screencasts, including quizzes, the product is heavily orientated towards video as an output. In this respect, it differs quite noticeably from Captivate which, as well as allowing you to  add narration, labels, highlights or any combination of these, also permits you to achieve the following:

  • Have the learner interact with the simulated application (in Training Mode) rather than just watch and listen to your presentation (Demo Mode).
  • Assess how well the learner can carry out a software task on their own, without prompts (Assessment Mode).
  • Output to Flash (with SCORM wrappers if you’re deploying on an LMS).
  • Output to F4V (Flash video), or as as a handout in Word/PDF format (any of which will lose you your interactivity).

And, of course, Captivate is much more than a screencasting tool. It has all the functionality needed for creating general-purpose e-learning modules.
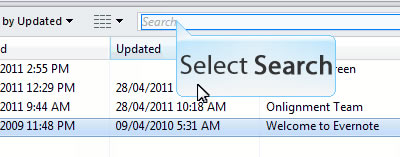
Captivate captions
Captivate can generate captions automatically, although these can always be edited later

Captivate feedback
Captivate also allows you to provide the user with feedback based on their interactions with the simulated software

Start with a plan

However impulsive you may be, it will save time in the long run to think through carefully what you are trying to achieve from your screencast:

  • If your screencast is going to be used for reference, then a demo is probably all you need (“show me”).
  • If you’re looking to build competence, then have the user interact with the simulated software (“try me”).
  • If you need to measure competence, then build in an assessment (“test me”).

Also consider the topic for your screencast. Don’t bother teaching functionality which is pretty obvious anyway – concentrate on those tasks which you know users are having trouble with. And rather than talking about the functionality in abstract, much better to tell a story, to demonstrate how the software is used to solve real world problems.
Reference information is best kept short and sweet. If you have four aspects of a system to describe, create four screencasts. If you really do need to build a more elaborate piece of content, then make sure you add a menu that enables users to get to the information they want without delay (but remember menus are of no use if you are exporting to video).

Scripting

The more elaborate your screencast becomes, particularly in terms of interactivity, the more you will benefit from designing it in detail before you commence production, and that is likely to include a script for the narration. As ever, the key to success here is making sure the narration comes over as natural and conversational. Much of that is in the writing (write for the spoken voice, not for the screen) and the editing (try reading it aloud and if this causes you any difficulty,  keep working on it), but delivery counts too. Not everyone will come over well as  a narrator. If, even with practice, you can’t deliver the script confidently and convincingly, ask someone else to help or, best of all, hire a professional.

Recording

With an online tool, you record the whole screencast in one take. If you make a mistake, you have to start again. With desktop tools, you are under much less pressure. You can record your demos piece by piece and assemble them together later. Mistakes can easily be edited out.
However, you still have to make some major decisions like the size of the capture window. Be mindful of the device and the software your audience will be using to view your screencast – if necessary focus in on a small area of the application.

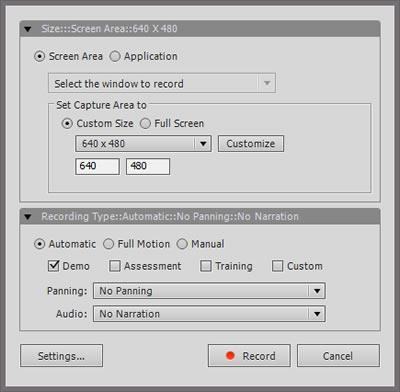
Camtasia record options
Recording options in Camtasia

Captivate record dialog
The dialog for setting recording options in Captivate

Editing

Here’s where desktop tools come into their own. You’ll find that just about any aspect of your screencast can be changed to suit your requirements. You can supplement your recordings with titles, menus, captions, highlights, interactions and much more.
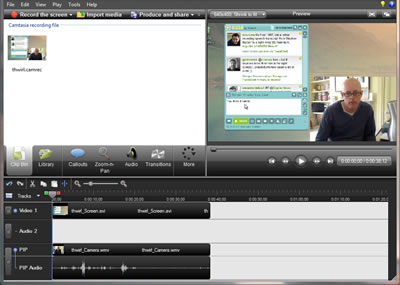
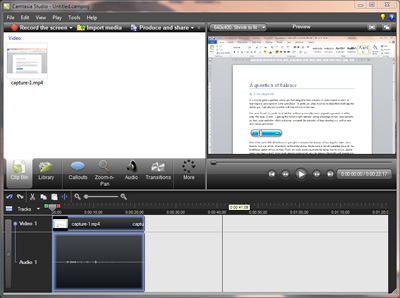
Editing in Camtasia
Camtasia provides much of the functionality of a full-blown video editor

Don’t rely on your own judgement. Test every aspect of your screencast out with colleagues or, better still, typical users, at each step in development. Don’t get precious about sticking to your original design – what matters here is that it works!
This guide is now also available as a PDF download
Take a look at our other practical guides
Coming next: A practical guide to creating learning scenarios
 

A practical guide to creating learning screencasts: part 2 – creating all-in-one-take screencasts

Practical guides
In part 1 of this guide, we looked at the arguments for screencasting and the two main types of tools – online, all-in-one-take and fully-featured desktop applications. In part 2 we take a look at the former.

Choose a tool

There are plenty of free online screencasting tool – you’ll find plenty listed in Jane Hart’s Directory of Learning Tools. To get your search started, you could do worse than take a look at screenr, screenjelly and screencast-o-matic.

Why use an online tool?

Here are some arguments for going the online route:

  • If they’re not free, then they’re certainly inexpensive.
  • You don’t have to download an install yet another desktop application.
  • They come with all sorts of nifty connections to other online tools, particularly social media.
  • The tools come with very basic functionality, so you’ll be up-and-running in minutes and won’t spend ages tinkering.

As you probably guessed, there are some drawbacks:

  • There may be some security issues having your organisation’s applications and sites shared online.
  • You need good internet connectivity.
  • Because you only get the one take and can’t edit your work or add extra functionality, you may not be able to achieve all you want.
  • If the vendor goes bust, bang goes your content (assuming you haven’t downloaded copies).

Choose your topic

All-in-one-take screencasts make great resources for just-in-time use or as elements in a blended offering. They need to be short (under 5 minutes) and highly practical. Don’t just work through all the functions in your application or on your site, regardless of whether anyone’s interested – describe how to do something really useful and not obvious. Everyone loves practical tools and tips.

Prepare

You’ll want to think through carefully what you want to show and how. If necessary, practise a few times until you feel confident that you can perform the task fluently. In most cases best advice would be not to script – the best screencasts are simple and conversational in tone. If you really must script, then edit the words carefully to make sure they sound completely natural.

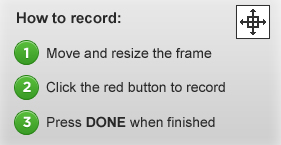
The instructions won't take long to read!

Setting up

Typically you will be asked to select the area of the screen that you want to capture or to pick one of a range of standard sizes. Remember that the screencast is likely to be viewed at less than the original size, perhaps much less if on a smart phone, so focus in on what’s really relevant. A few tests should help you to find the most appropriate arrangement.
If you have more than one microphone on your system, then you’ll have to specify which one you want to use. As with all audio, quality does count – if you have a quality mic (ideally with a pop shield) then use it. If not, use what you have, but try to ensure there’s not a lot of background noise.

The screenr toolbar is typical of all these tools. You can set the capture dimensions, choose your mic and then start, pause and stop the recording.

Record

First, briefly introduce yourself and explain what it is you will be showing and why viewers will find this useful. Then commence your live performance (no pressure then), pausing where necessary. If you make minor stumbles, don’t stop, because chances are no-one will notice or care. Obviously if you make a complete hash, there’s no problem in starting again.

Sharing

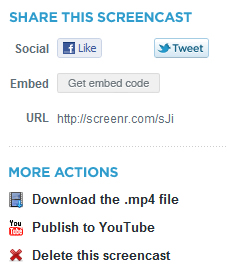
Screenr allows you to share your screencast in a number of ways or download to use locally

Depending on the tool, you’re likely to have plenty of ways to share your screencast:

  • Provide a link in an email, tweet, blog post or forum post or on your intranet, web site or LMS. The user will be taken to the vendor’s website to see the screencast.
  • Alternatively play the screencast directly in a web or forum posting or  on a web page by embedding the HTML code supplied by the vendor.
  • Download the screencast as a video. You can then upload it to your website, intranet or LMS, or send it out as an email attachment.
  • Publish the video on YouTube.

Coming in part 3: Using more sophisticated desktop tools.

A practical guide to creating learning screencasts: part 1

Practical guidesA screencast is a demonstration of a task carried out in a software application or on a web site for use as a learning aid or for reference.
To create a screencast, you simply carry out all the operations involved in completing the task and the software records this as an animation. This animation can be annotated with text labels, accompanied by an audio narration or both. Some authoring tools allow you to go beyond offering simple demonstrations, to provide the learner with opportunities to try out the tasks for themselves using a simulation of the original software.
This 3-part practical guide explores the potential for screencasting, describes the different types of tools available and provides some tips on how to make a good job of your own screencasts.

Media elements

A screencast contains one essential visual element – an animated software demonstration – supplemented by a verbal explanation, presented either as a series of pop-up text labels, an audio narration or as a combination of the two. Typically screencasts are presented as short, self-contained modules or in short sections, to make it easy for the learner to access the material in small chunks and often to practise as they go.

Interactive capability

Many screencasts are passive, presented as short videos which the learner can review quickly and then try out for real. Others incorporate simulations of software tasks which allow the learner to practise without having to leave the screencast and use the real application.
In their passive form, the most likely strategy for the use of screencasts is exploration, as material for use by learners at their own discretion, typically for reference. When simulated tasks are incorporated into the screencasts or when screencasts are combined with other activities that allow the learner to practise what they have learned, they can also play a key role in an instructional strategy.

Applications

Screencasts have two very obvious applications: they can be used as part of a formal training programme to introduce a new or revised software application or web site, or as reference material for people who are already users.

Screencasting tools

Some screencasting tools have been around for many years, long before the term ‘screencasting’ had been coined. These tools, like Techsmith Camtasia and Adobe Captivate, are desktop applications with sophisticated functionality. Over the years, their capabilities have been increased to support many forms of digital learning content, not just screencasts. These tools allow many ways for the learner to interact with the screencast and to undertake assessments. They also allow the author much greater control over the way in which the screencast is displayed.

Camtasia
Desktop tools such as Camtasia provide much of the functionality of a video editor and an elearning authoring tool

Other, much more recent tools, such as screenr and screenjelly, operate ‘in the cloud’. They allow you to create simple software demonstrations ‘all in one take’ and then to publish these online. In the next part of this guide we’ll be taking a much closer look at these online tools.
screenr
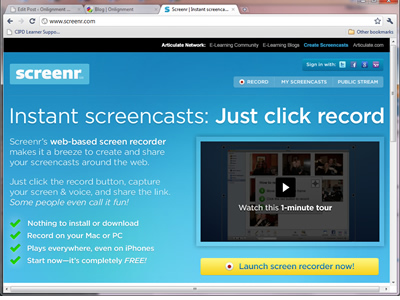
Simple online tools such as screenr allow you to produce screencasts in one take

Coming next: creating all-in-one-take screencasts
Thanks to Craig Taylor for inspiring this guide with his session at the eLearning Network event on April 8th.