A practical guide to creating learning tutorials: part 1

Practical guidesThe digital learning tutorial is anything but a new concept. Almost as soon as computers became generally available, efforts were made to automate the process of teaching through the medium of self-study lessons. Under the guise of CBT (computer-based training), interactive video or e-learning, and on a variety of platforms from green-screen mainframe terminals to the early microcomputers, using videodiscs, CD-ROMs, web resources or smart phone apps, the format stays pretty constant – a carefully-crafted sequence of screens displaying learning material and providing opportunities for interaction.
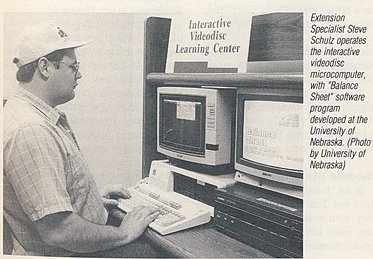
The digital learning tutorial is not a new concept

Strange as it may seem, as a result of this long history, instructional designers (those who design these tutorials) are as much a part of the training establishment as those who’ve spent much of their lives in the physical classroom. A handful have been at this task for 30 years or more and they have learned a thing or two along the way. In this practical guide, we’ll attempt to pass on some of the wisdom that has been passed down about the design of learning tutorials, while acknowledging that change is occurring very fast in learning and development and that, as a result, what worked in 1981 when the IBM PC was first launched may not be quite so appropriate in 2011.
The traditional tutorial is free-flowing and interactive - its digital equivalent should be no different

So what is a tutorial? The Concise Oxford Dictionary defines a tutorial as “a period of teaching or instruction given by a tutor to an individual or small group.” This hardly sounds like an efficient way of bringing about learning; indeed, only a select group of universities are still prepared to go to this much trouble for their students, and trainers are no different. Luckily, the same dictionary provides another definition: “A tutorial is an account or explanation of a topic, printed or on-screen, intended for private study.” This is nearer to what we’re looking for, but with some of the interactivity, perhaps, that we might find in the face-to-face tutorial.

Media elements

A digital learning tutorial can and frequently does utilise every available media element. Verbal material can be provided in textual form or as audio. Visual material can range from simple photos, illustrations and diagrams through to animations, 3D environments and video. The perfect combination is one that communicates the learning material clearly to the intended audience, while working within the constraints of the available technical infrastructure.

Interactive capability

A tutorial is essentially interactive. Screencasts, slide shows, podcasts, videos and all manner of other digital resources can be used effectively without any built-in interaction. Not so a tutorial. Here interaction is the key to what is typically intended as a completely self-contained learning experience. An exposition of learning content followed by a quiz does not constitute a tutorial. To be effective, interaction needs to be integrated into every step of the learning process.
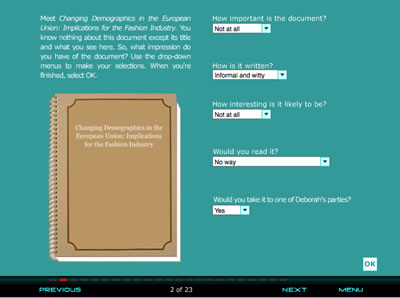
Interaction is integral to the tutorial

Applications

A digital learning tutorial is an instructional device. Instruction is guided by clear objectives. It uses appropriate strategies to support learners as they progress towards these objectives. It is responsive to the difficulties learners may experience along the way. It finishes when the job is done, not when time is up or when all the slides have been shown.
Instruction is particularly valuable when your goal is to provide essential knowledge or to teach rule-based tasks. Designed well, it is capable of providing consistent, measurable results. While those with higher levels of expertise in the topic might find this process laboured, even patronising, novices will be thankful for the structure and support.

So how do I get started?

It is possible to create learning tutorials with a general purpose tool like PowerPoint, but you will be severely limited in what you can achieve interactively (you can branch between slides using hyperlinks, but this is a fiddly method to use for anything other than the simplest interactions) and you will not have the functionality necessary to track progress in a learning management system.
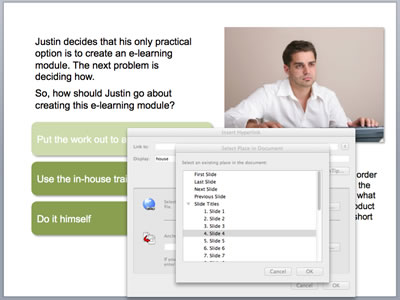
You can create interactions in PowerPoint using hyperlinks between slides but this is a laborious process and you are limited in what you can achieve

The same applies if you use a standard web development tool like Dreamweaver (although, to be fair, Adobe do provide the additional functionality required for building tutorials in a special version of Dreamweaver available as part of their eLearning Suite).
Most people prefer to use a tool that is specially designed to support the development of e-learning. These come in desktop form (Articulate, Captivate, Lectora and many others) and also as online tools available through your web browser. You’ll be looking for a tool that’s easy to use but that is also capable of delivering the level of interactivity that you require.
Much more important than the tool is what you do with it, and that’s what we’re moving on to next.
Coming in part 2: Creating knowledge tutorials

A practical guide to creating learning videos: part 4

Practical guidesIn part 1 of this series we examined the potential for video as a learning tool. In part 2, we moved on to look at the steps involved in pre-production. Part 3 took us to the shoot. And so to the final stage in the creation of a learning video – post-production. At this stage we collect together all the material that we shot at the production stage, select what we want to keep and what we can safely leave ‘on the cutting room floor’, edit all this together, add titles, graphics, music and effects, export as a finished product and distribute to our audience. This may all seem very technical but modern software has transformed much of this to a process of drag and drop, copy and paste. So let’s get started.

Editing

Editing is not obligatory. There’s nothing to stop you shooting something straightforward like an interview to camera and then uploading the results, without modification, to a site such as YouTube. But even the simplest videos will usually benefit from a little editing, even if just to trim the start and finish points and add a caption to inform the viewer who it is that’s speaking. This sort of editing is a doddle. And while you’re at it, why not add a title, perhaps with a little music behind? Yes, before you know it, you’re putting together videos that, while not quite professional in quality, don’t annoy the viewer with their amateurishness.
The aim of editing is to be invisible. In other words, you want the viewer to be able to concentrate on the content of your video without becoming aware of any of the mechanics of production and post-production. If you’ve done a good job, no-one will say what a good job you’ve done of putting it all together – they’ll just thank you for a great piece of content.

Editing software
Editing software works much the same way whether its a free program like iMovie (left) or a full professional package like Adobe Premiere Pro (right)

Video editing software comes at three levels of sophistication: (1) the free programs that come with your computer, such as MovieMaker (Windows) or iMovie (Mac), (2) budget versions of the top-end tools, such as Adobe Premiere Elements (under $250) and (3) the top-end tools themselves, Final Cut Pro (Mac only), Adobe Premiere Pro and Sony Vegas Video Pro. Although you wouldn’t think so from the price tags, pretty well all video editing software is roughly the same. The free software will get you a long way and may be more than enough for all your future needs. If you love playing with software, you’ll want more features and the mid-level tools will provide you with plenty of toys. The top-end tools are for pros and if you’re one of them you won’t be reading this guide.
Your basic editing tasks are as follows:

  1. Import your clips from your camera.
  2. Choose the clips you want to use and drag and drop them onto the timeline.
  3. Where appropriate, split clips up into smaller clips.
  4. Trim the start and end point of each clip.
  5. Arrange the clips into sequence.
  6. A simple cut between clips is usually best, but in some cases you may want to create a transition, perhaps some form of cross-fade. If you want your editing to be invisible, then avoid flashy transitions.
  7. Overlay titles and captions where appropriate.
  8. You may want to cut away to photographic stills or graphics. By contrast with your video clips, these could look overly static, so consider adding movement through some subtle panning or zooming.
  9. To help create the right mood, consider adding a music track, particularly in those sections where there is no speech.

With a little practice, these tasks will be simple enough to perform. If you want more help, there are plenty of great how-to videos on YouTube – which only goes to emphasise what a great learning tool video can be. Look for inspiration on YouTube and on the TV. In particular, focus in on those programmes in which the editing is almost invisible and try to identify the techniques that were used to achieve that result.

Sharing

Now your video is ready to go, you’ll want to get it into the right format for your intended audience. You’ll probably want to distribute your video material in one of the following three ways:

  1. On a DVD: In this case your editing software will guide you through the steps needed to write a single disc or to prepare a disc image for duplication.
  2. As an element within an e-learning module: The key here is to find out what formats and resolutions are supported by your particular authoring tool. Obviously you’ll want your video to be played back in the largest video window and with the best audio quality possible, but check out whether your this will be realistic given the bandwidth available to your audience.
  3. Through a video streaming service such as YouTube: We all know how YouTube works and how well it adapts to the available bandwidth and the particular device you are using. You can upload to YouTube in quite a range of formats, but you should probably check out the most appropriate options on the YouTube site first. Your videos do not have to be made public – if you prefer you can restrict access only to those who are provided with the URL. Even so, if you need a completely secure service, YouTube may not be the answer. Check with your IT department or LMS provider to see what other options are available.

Exporting video
Share your video on DVD, as part of an e-learning module or on a video streaming site

Don’t be too put off by the thought of the burden you will be placing on your organisation’s network by making video available online. Chances are your network is capable of supporting hundreds, perhaps even thousands of simultaneous users without undue strain. But do check first. You won’t be popular if business grinds to a halt as scores of employees rush to sample your latest offering.
That concludes this practical guide. Good luck!
This guide is now also available as a PDF download.
Coming next: Creating learning tutorials

A practical guide to creating learning videos: part 3

Practical guidesIn part 1, we looked at the various forms that learning videos can take and the ways they can be used, either as a stand-alone solution or as an element in a blend. In part 2, we moved on to look at pre-production – all those tasks that need to be completed before you press record on the camera. In this instalment, we get to the shoot itself, with some hints and tips for the set ups you’re most likely to encounter when producing learning videos.

The ‘piece to camera’ or PTC

The piece to camera
We’re all familiar with the piece to camera as a technique used in news broadcasts, but in the context of low-budget learning videos, we’re more likely to use this approach to record a response to a question. The following tips will help you to do an effective job:

  • Explain to the subject what you are going to do and what question you would like them to answer.
  • Make a note of the subject’s name and check the spelling with them before you leave.
  • Find an interesting setting, ideally one which will  reflect the context of the topic.
  • Position the camera at the subject’s eye level, ideally on a tripod. Whatever you do, do not look down on the subject.
  • Frame the shot so you don’t leave lots of space above the subject’s head as this will make them look short.
  • Ask the subject to look directly into the lens.
  • Don’t rehearse if you want the subject’s response to sound really natural.
  • If you’re feeling adventurous, add some movement by using an occasional slow zoom in and out.

The interview

The interview is one of the principle video formats and one that has real value for learning. In the ideal world you would shoot an interview with two cameras – one for the interviewer and one for the interviewee – and then choose the shots you would like to go with during the edit. However, this series is about what you can do with very little equipment and very little experience, so let’s see what you can do with a single camera.

Simple interview
Your simplest option is to set up the camera on a tripod and leave it with interviewer and interviewee in shot

If you want to keep it simple, frame your shot to include both the interviewer and interviewee (see above). If at all possible you should use an external mic, which the interviewer can hold.
It’s also possible to simulate a two-camera shoot and this will certainly provide you with a more interesting end result, particularly if the interview is extended. You’ll need to set up at a number of different angles:

  • A shot which shows both the interviewer and interviewee (a ‘two-shot’), to establish the scene and prove that this interview really did happen with both parties present at the same time! Sometimes this is shot over the interviewer’s shoulder (an ‘OTS’).
  • Close-ups of the interviewee listening to the questions (which are being spoken off camera) and then giving their answers.
  • Reverse shots of the interviewer listening intently to the responses (usually called ‘noddies’). These can be useful in covering up any cuts you want to make in the interviewee’s answers.
  • Reverse shots of the interviewer asking the questions. Be clear that, because you have only one camera and mic, these are recorded separately from the interviewee’s answers – you can safely ditch the original questions to which the interviewee responded.
OTS
An over-the-shoulder shot establishes the scene

The presentation

A video recording of a lecture or presentation is an invaluable way to extend the reach beyond the initial face-to-face audience. Your simplest option is to record the presenter and any slides in one mid-shot. The camera will need to be on a tripod for stability. If the presenter is using a mic then your best best is to take a feed from this directly. If not,  you’ll need to provide your own, ideally a radio mic that the presenter can attach to their shirt. Don’t rely on the mic built into your camera as you’ll be too far away from the presenter to get a clear signal.

Presenter with slides
Your simplest option is to shoot the presenter and the slides in one mid-shot, but you'll do well to make the slides clearly visible

If you don’t mind doing a little editing later, then you could mix up the shots …
Four views are better than one
You'll achieve a more interesting result by starting with a wide shot, cutting between a close-up of the presenter and his or her slides, and mixing in some audience shots

A wide ‘establishing’ shot of the meeting room will set the scene. Then cut between a close up of the presenter and his or her slides. Don’t shoot the slides at the time – get a copy of the presentation, save each slide off as an image and then import these directly into the edit. You might also like to get some cut-aways of the audience to provide more visual interest.
Coming up in the thrilling final instalment: post-production

A practical guide to creating learning videos: part 1

Practical guidesVideo is very much the medium of the moment. Not only do we spend many hours each day watching it on our TVs, it has become an integral part of the online experience. An ever-increasing proportion of the population does not only consume video, it creates and shares it with a world-wide internet audience. Whereas once video cameras cost many hundreds, if not tens of thousands of pounds, they are now integrated for no additional cost in computers, stills cameras and mobile phones. And where once video editing could only be carried out by skilled engineers in elaborate editing suites, it can now be accomplished, often with equivalent production values, with free or low cost software on PCs and even mobile devices.

Video production then and now
Gone are the days when, to shoot a video, you depended on the services of a full crew and expensive equipment

Video editing then and now
The same applies to the post-production process. What once required an edit suite can now be accomplished with a smart phone app

In a learning context, video provides a compelling means for conveying content, particularly real-life action and interactions with people. Amazingly, it can also be quicker and easier to produce than slide shows or textual content. Sometimes you just have to point the camera, press record, shoot what you see and then upload to a website. Obviously it won’t always be that easy, but you should start with the attitude that `”I’ll assume I can do it myself, until proven otherwise.”

Media elements

In its purest form, a video is a recording, in moving pictures and sound, of real-life action as captured by a video camera. In actual practice video goes way beyond live action, and is capable of integrating just about every other media element, including still images, text, 2D and 3D animation. At the heart of video, however, will always be moving images of some form and an audio accompaniment, whether ambient sound, voice, music or some combination.

Interactive capability

As a general rule, video is not interactive, other than in an exploratory or navigational sense. And for the purposes of this Practical Guide we will be assuming no interactivity. Having said that, it is possible to build interactivity into video, whether that’s on a DVD, a digital TV system or online; it’s also possible to incorporate video material into what are essentially interactive media, such as scenarios and tutorials.

Interactive video
Although not the focus of this guide, video can be used interactively using DVD, digital TV or online. It can also be used as an ingredient in an interactive scenario.

Applications

In its purely linear form, video can be useful for the simple exposition of learning content, such as lectures, documentaries, panel discussions and interviews. It can also function within a more learner-centred context, as  a means for providing how-to information on demand, a facility that has been demonstrated with enormous success on YouTube.
As mentioned above, video also has a role to play within the more structured strategies of instruction and guided discovery, as a component within, say, interactive tutorials and scenarios. It is ideal for setting the scene for a case study or demonstrating a skill. It can also be effectively used as a catalyst for discussion in a forum or in a classroom.
Video is a rich medium in every sense. It is highly engaging and can portray real actions, behaviours and events more faithfully than any other medium. However, this comes at a price. Video is also data rich, and consumes vast amounts of bandwidth. On a CD or DVD this causes no problems, but your IT department will certainly want to know if you are going to be distributing video on a large scale over your company network.

So how do I get started?

Enough of the theory. You’re probably keen to get started. You’ll have to wait a week or two but in the subsequent parts of this Practical Guide, we’ll be looking at the absolute basics of:

  • pre-production: planning, scripting and choosing your camera
  • production: shooting a skills demonstration, a piece to camera, an interview, a lecture/presentation, an acted sequence, an animation – and when to admit defeat and bring in the experts
  • post-production: editing; adding titles, music and graphics; exporting / sharing

Coming in part 2: pre-production
 

A practical guide to creating learning scenarios: part 4

Practical guidesIn part 1 of this series, we looked at what a learning scenario is, its basic structure, capabilities and applications. In part 2 we saw how simple scenarios could be used to help learners to undertake principle-based tasks. In part 3 we looked at how you could use simple scenarios to help learners to practise rule-based tasks. In this final part, we turn our attention to branching scenarios, which provide a more immersive approach to learning principle-based tasks. This builds on what we covered in part 2, so you might want to check back on that first. Our focus us here is on what it means for a scenario to be branching.

Why branching?

To understand the value of branching, you first need to understand how a scenario looks when it doesn’t branch:
Linear scenario
The diagram shows the learner being presented with a situation (S) and three choices. The learner is then immediately provided with feedback (F), related directly to the choice that they have made, pointing out positive aspects and correcting any misunderstandings or errors. All learners then proceed to the second stage of the scenario. Although the feedback can be considered to be branching, the overall path is linear.
While a linear scenario works well it many situations, it doesn’t resemble real life, where you get to experience the results of your decisions, for better or for worse.
With a branching scenario, it will be possible for different learners to progress along different routes through the scenario and to experience different end points. Where you arrive depends on the decisions you make along the way.
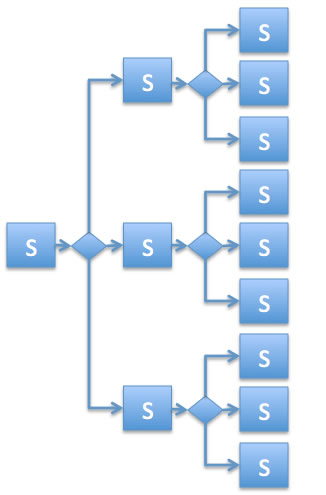
Branching scenario
The diagram shows only the initial two stages in the scenario – there could, of course, be many more. As you can imagine, if at every stage the scenario trebled in size (assuming three choices) it would soon become unmanageable. In practice, many branching scenarios return to a common narrative at key points or kick the learner out early if their initial choices represent fatal mistakes.

Providing the learner with feedback

Looking at the second flow chart above, you might wonder where all the feedback went! Well, first and foremost, feedback is implicit in the branching that occurs. If you shouted at the customer in situation 1, you’ll get your payback in situation 2.
Another way that feedback can be provided is with some sort of visual indicator, as the following examples show:

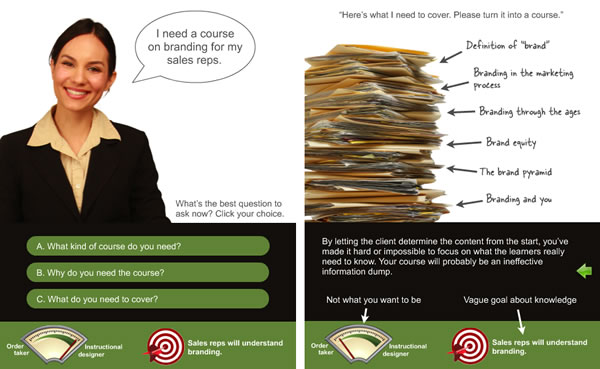
Extracts from Cathy Moore scenario
This scenario aims to help you make the transition from order taker to instructional designer and the meter at the bottom left gives you an update on your progress. On the right is an example of the feedback the scenario provides.

Thanks to Cathy Moore for this one. You might also be interested in the flowchart that Cathy created to help her design and test this scenario.
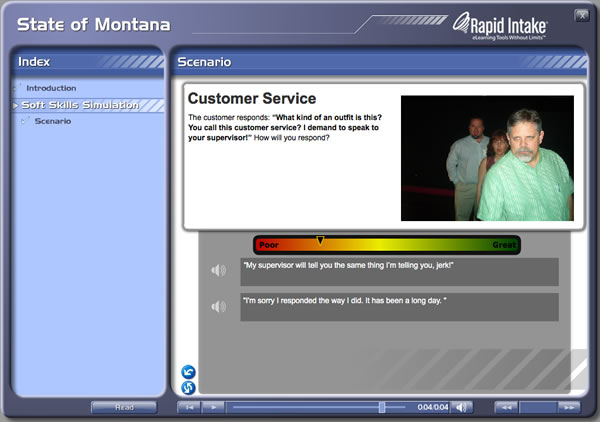
Extract from Montana scenario
This scenario, produced using the Rapid Intake tool, provides you with a traffic light indicator of how well you are doing as you progress through.

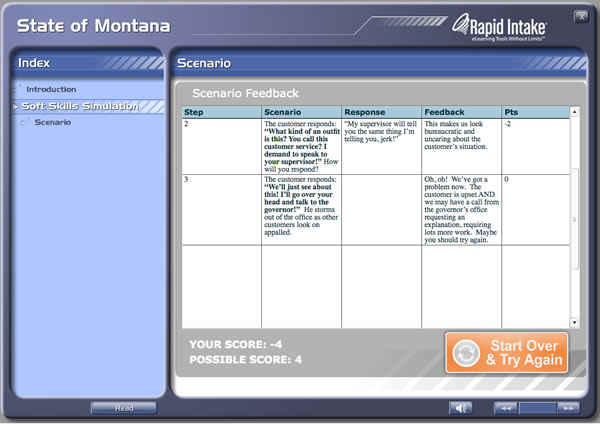
Extract from Montana scenario
At the end of the scenario, you are provided with detailed feedback on each one of your responses. You can then start again if you wish.

And thanks to Garin Hess at Rapid Intake for this example, which shows how comprehensive feedback can be provided at the end of the scenario.

Deciding on the look and feel

You can use any combination of still images, text, audio and video to present the situations in your scenarios, although the evidence is stacked against using text and speech simultaneously. Your decision is likely to be made on the basis of (1) how much realism is needed to adequately convey the situation, and (2) how much time and money you have got available to you.
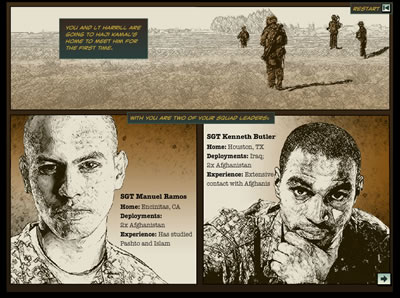
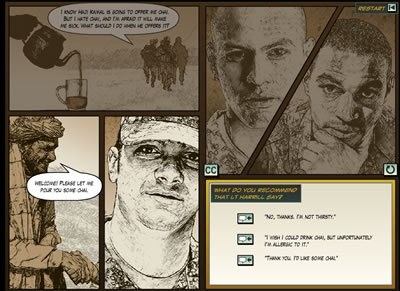
Cathy Moore, along with her friends at Kinection, turned to a comic book approach for the acclaimed Haji Kamal scenario:

Extract from Haj Kamal
This scenario uses an eye-catching comic strip approach, achieved by converting photographs into illustrations. This extract is part of the scene setting.

Haj Kamal extract
Still using the comic strip approach, the learner is presented with a situation and a number of options for action.

Tools for developing branching scenarios
It is perfectly possible to build simple branching scenarios in PowerPoint and then convert to Flash using a tool that supports branching such as Articulate Presenter. General purpose desktop authoring tools, such as Adobe Captivate and Lectora, or online tools such as Rapid Intake’s Unison, have all the functionality you need. There is also talk of Articulate having a specialist scenario-building tool, called Storyline, in the pipeline for later in 2011.
Enjoy your story-telling.
A PDF version of this Practical Guide is now available.
Next up in the series is a Practical Guide to producing learning videos.

A practical guide to creating learning scenarios: part 3

Practical guidesIn part 1 of this series, we looked at what a learning scenario is, its basic structure, capabilities and applications. In part 2 we saw how scenarios could be used to help learners to undertake principle-based tasks. In this third part we look in more detail at the steps involved in creating simple scenarios to help learners to practise rule-based tasks. Although scenarios are usually thought of as tools to support more complex problem-solving and decision-making, as we shall see, they can as easily be used as a technique for practising more routine, everyday tasks.

Rule-based tasks don't require you to make judgements, just to follow instructions

When we talk about ‘rule-based tasks’ we mean those activities that can be carried out repeatedly according to clearly laid-out instructions. The job holder is not required to make a judgement, just to follow the rules – if this … do that. In the developed world, it would be fair to say that less and less tasks are of this nature, because routine tasks that obey strict rules can often be undertaken by robots or computers, transferred off-shore where the labour is cheaper or just looked up from some reference source as and when needed. Having said that, everybody’s job involves some rule-based elements, and some tasks simply can’t be carried out by a machine or at a distance.

Step 1: Teach the rules

Principle-based scenarios are typically used as an element in a process of guided discovery. The  scenario brings out issues which can then be reflected upon and discussed, hopefully resulting in learner insights. A task-based scenario is much more likely to be used within an instructional strategy – you teach the rules, then have the learner practise applying them in realistic situations.
So, before building the scenario, be clear about what the steps are in the procedure you want to teach and the rules that need to be applied at each step. Then create some content to get all this across:

  • provide an overview of the task and why it is important
  • demonstrate each step, explaining the rules that need to be applied and why these are necessary

Don’t over-teach. The idea is to provide the minimum information necessary for learners to be able to have a go themselves. The detail can be filled in later, either as feedback within the practise scenarios or as further reading.

Step 2: Develop a storyline

You can then set about designing your scenarios. The idea is to provide the learner with the most realistic experience of the task that you can. For more difficult tasks, start with a simple initial practice that will allow the learner to build their confidence by applying the most basic rules. Then move on to provide more difficult scenarios that require the learner to apply more complex rules. Aim to provide enough opportunities for practice that any learner will be able to gain confidence in applying the rules to real tasks.
You will not always be able  to provide completely  authentic practice opportunities. Sometimes your scenarios will be just a first step to be followed up by more realistic practice away from the computer.

Step 3: Develop your script

As with principle-based scenarios, use whatever media are necessary to convey the storyline. Text and images will often suffice, but if you need a more realistic experience, you have the option of richer media – perhaps even 3D graphics.
As ever, your hardest job will be to develop suitable questions. Where possible, these should match the real-life experience, so if the real task requires someone to type a code into a form field on a computer, then have them do the same thing in your scenario.

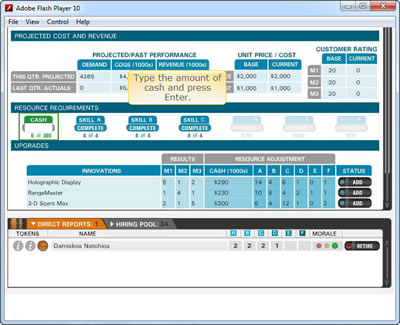
If you can, make the interaction match the task. Here the learner is required to complete a form field as they would in a real software application.

If you plan to use multiple-choice questions, then make sure that all the options are plausible

Ideally every option should have its own feedback. This allows you to correct any misundertandings that might have led to an incorrect answer and to add little details that you might have held back from your initial demonstration.
The feedback you provide can be used to correct any misunderstandings and to add extra detail

Step 4: Test and revise

As early as you can, have some sample learners try out your scenarios. Find out from them whether the scenarios are sufficiently realistic, whether they understand clearly what they have to do, whether the questions are set at the right level of difficulty, and whether the feedback is helpful. Be prepared to make lots of refinements until you get it right.

Coming in part 4: creating more complex branching scenarios

A practical guide to creating learning scenarios: part 2

Practical guidesIn part 1 of this series, we looked at what a learning scenario is, its basic structure, capabilities and applications. We move on now to look in more detail at the steps involved in creating simple scenarios to support learners in understanding the principles underlying everyday problem-solving and decision making. Scenarios are well suited to this type of learning problem, because they provide learners with the opportunity to experiment with different responses to the sorts of situations that they could encounter in their jobs and to gain insights into the dynamics which can determine success and failure.

Principle-based tasks require you to make judgements rather than simply follow rules

When we talk about ‘principle-based tasks’ we mean those jobs that cannot be accomplished by following simple rules – ‘if this happens then do that’. Principle-based tasks require you to make judgements on the basis of the particular situation you happen to be facing. They require you to understand cause and effect relationships, i.e. principles:

  • Projects with unclear objectives are more likely to fail.
  • Irritable behaviour can be caused by lack of sleep.
  • You’ll find it easier to cope if you don’t look at each email as soon as it comes in.
  • An impolite greeting will turn the customer against you before you’ve begun.

Principles such as these are relevant to just about any job you can imagine, although clearly some more than others. They are rarely black and white – in fact they are often the subject of differing opinion. Principle-based tasks, therefore, require a very different treatment and this is where scenarios come into their own.

Step 1: Decide what principles you want to bring out through the  scenario

A scenario needs a clear purpose – don’t use it just to lighten up what would otherwise be a boring piece of e-learning.  Be realistic about what you can achieve in one scenario. You may be able to tackle a simple principle with a single question, but often a whole series of questions will be required to bring out all the elements and to compare different perspectives. A lot depends on your learner. Novices will want to look at a single issue at a time, whereas more experienced practitioners may feel comfortable immersing themselves in a complex situation with all sorts of competing pressures. If in doubt, keep it short and simple.

Step 2: Develop a storyline

Your next task is to develop a storyline that will bring out the principles you have chosen to focus on. It is really important that this storyline is credible with your audience. They must be able to relate to the situation and the characters. If you are struggling for ideas, ask a sample of your potential learners to describe the situations they face in their own day-to-day work. As with TV drama, be careful not to base your plot too closely on a real-life incident in case you reveal the identity of the protagonists.
The problems that you set should be challenging yet achievable. Remember that what is challenging for a beginner may be completely obvious to an old hand, so adapt your scenario to your audience. With beginners, it’s a good idea to start with relatively straightforward and routine problems, and move gradually to the more complex cases in which right and wrong is not so easy to establish.

Step 3: Develop your script

Use whatever media are necessary to convey the storyline. More often than not text will do the trick, but some situations will be hard to get across without richer media.

You can use any media to describe the situation, but text and graphics will often suffice

This scenario is presented as a dialogue shown as a series of pictures with speech bubbles

Without doubt, your hardest job will be to develop plausible options for your questions. Every option should be tempting to at least a minority of your target audience. Throwaway options, which are clearly not going to work, will devalue the whole process.
Each of the options you present needs to be plausible, at least to a minority of your target audience

Assuming this is not a branching scenario (and we’ll be dealing with these later in the series), every option should have its own feedback. Writing this feedback will not be as simple as “Correct – well done” or “Sorry, incorrect.” Every answer deserves a considered response, weighing up all the pros and cons. If the feedback won’t fit on the same screen as the question, jump to a new screen where you have more room. Remember that this feedback will be the primary source of new learning, so it shouldn’t be wasted.
Again, assuming you are not creating a branching scenario, you should allow the learner to explore any and all of the options before moving on. A scenario is not an assessment, so don’t follow assessment rules.
Each option here has its own feedback, written to bring out the pros and cons of the learner's choice. Learners are free to select as many options as they like.

Step 4: Test and revise then do it again

You’ve probably got the message by now that a scenario needs to be authentic. The only way you will tell whether you’ve got this right is to try it out with typical learners. Bring them in early. Have them provide a verbal commentary to you as they attempt the questions. Act on their feedback and then test again. You are not admitting a mistake by changing your script – you are showing how much you want to make it work.

Coming in part 3: creating simple scenarios for rule-based tasks

A practical guide to creating learning scenarios: part 1

Practical guidesA learning scenario consists of a description of a realistic situation (usually fictional), accompanied by one or more questions that challenge the learner to respond to some aspect of that situation. At its simplest, a scenario could consist of a single description followed by a single question, but it could also develop in stages with one or more questions at each stage. In the case of a branching scenario, the information depicted at each stage will vary depending on the answers the learner made at previous stages.
The information that describes a scenario could be presented using a wide range of media elements, including text, images, animations, audio and video, in various potential combinations. What is more important than the media mix is that the situation described to the learner seems relevant and authentic.
Although, in theory, a variety of different question formats could be employed to challenge the learner about aspects of the situation, the most common and the most versatile is the simple multiple-choice question:

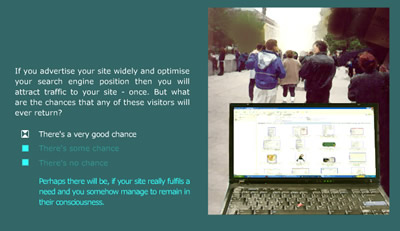
This simple scenario is presented as a short text statement with an accompanying picture. The learner then has three options from which to choose. Feedback is provided simply in text depending on the option selected.

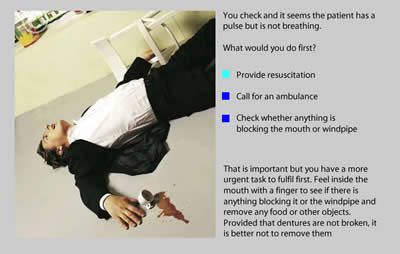
Note that scenarios can be presented in the third person, as in the example above, where you are an observer to the situation, but they can also be delivered in the first person, with you as an active participant in the situation:

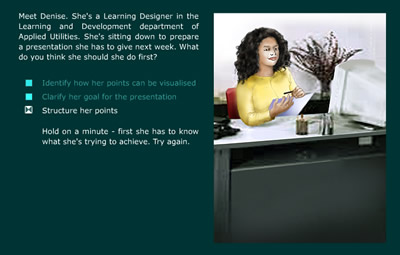
What would you do first?

Feedback plays a very important role in a learning scenario. This could be explicit and immediate, as in the example above. However, in a branching scenario, the feedback occurs implicitly, by what happens next – you learn by seeing the potential results of your decisions.
In this practical guide, we’ll be exploring scenarios in all of these forms.

Media elements

As we have seen, a scenario has three core components:

  1. A description of a situation
  2. A question with various options
  3. Feedback on the options selected or, in the case of a branching scenario, a jump to the next stage in the scenario

The first and third of these could be presented in a wide variety of forms:

  1. Simple text
  2. Text with one or more images
  3. Audio with images or animations
  4. Video

The question and options will normally be presented textually, to provide the learner with as much time as they need to reflect on their decision.

Interactive capability

A learning scenario is by nature interactive – a case study with questions built in. Although, in this Practical Guide, we are focusing on fully-interactive scenarios, it is worth mentioning that very similar results could be obtained by combining a more conventional case study with some means for collaboration, such as a forum, a blog or a classroom discussion.

Applications

Principle-based tasks: A learning scenario is most commonly used to help a learner gain insight into key principles that influence the problem-solving and decision making elements of their work. The focus here is on tasks that cannot always be accomplished through the application of a few simple rules – there is a need for critical judgement to be applied. In these cases, a strategy of guided discovery is usually applied. The scenario is positioned early in the solution, before the formal presentation of learning material. It provides a chance for the learner to experiment with different approaches and to reflect upon the possible outcomes.
Rule-based tasks: However, a scenario could also be used as a means for practising a simpler, rule-based task. Here the strategy is more likely to be instructional, with the scenario coming later in the solution, after the rules have been explained.

Scenario-building tools

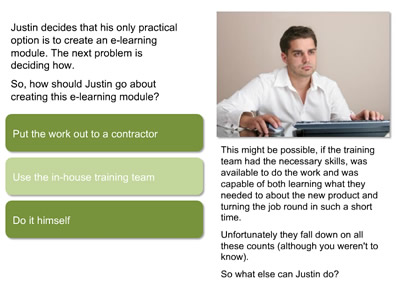
Scenarios can be produced quite simply in tools such as PowerPoint, using hyperlinks to jump from slide to slide depending on the learner’s selections. Further functionality can be added by converting the slides into Flash, using tools such as Articulate or Adobe Presenter.

Scenario created in PowerPoint
This scenario was created using Microsoft PowerPoint

For maximum flexibility, use a fully-fledged e-learning authoring tool, such as Adobe Captivate or Lectora.

Coming in part 2: creating simple scenarios for principle-based tasks

A practical guide to creating learning screencasts: part 3 – using desktop tools

Practical guidesIn part 1 of this guide, we looked at the arguments for screencasting. In part 2, we examined how best to work with simple, online, all-in-one-take tools. In this final part, we check out the more fully-featured desktop screencasting tools.

Choose a tool

Desktop screencasting tools have been around for well over a decade. Over time, two tools have emerged as clear front-runners – Adobe Captivate and Techsmith Camtasia. However, other tools can definitely do the job, including the free Wink. There are also much higher-end performance support tools as well as applications designed specifically to support screencasting for ERM systems such as SAP and Siebel.

What you can do with these tools

Desktop tools will give you much greater functionality than online tools. Whether you need this functionality or not only you can decide. For example, Camtasia will allow you to:

  • Record a webcam stream alongside the screencast. This feature requires some care, because it could just create visual noise.
  • Edit your screencast just like a video.
  • Record narration quite separately from the recording of the software demo.
  • Not use an audio narration at all, focusing instead on the use of text labels and highlights.
  • Share your output in a wide variety of ways including CD-ROM, a YouTube-ready format, or as an MP4 video for Apple mobile devices.

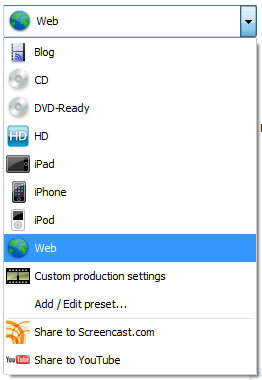
Camtasia output
Camtasia allows you to output to a wide range of formats, especially video

Although you can add interactivity to Camtasia screencasts, including quizzes, the product is heavily orientated towards video as an output. In this respect, it differs quite noticeably from Captivate which, as well as allowing you to  add narration, labels, highlights or any combination of these, also permits you to achieve the following:

  • Have the learner interact with the simulated application (in Training Mode) rather than just watch and listen to your presentation (Demo Mode).
  • Assess how well the learner can carry out a software task on their own, without prompts (Assessment Mode).
  • Output to Flash (with SCORM wrappers if you’re deploying on an LMS).
  • Output to F4V (Flash video), or as as a handout in Word/PDF format (any of which will lose you your interactivity).

And, of course, Captivate is much more than a screencasting tool. It has all the functionality needed for creating general-purpose e-learning modules.

Captivate captions
Captivate can generate captions automatically, although these can always be edited later

Captivate feedback
Captivate also allows you to provide the user with feedback based on their interactions with the simulated software

Start with a plan

However impulsive you may be, it will save time in the long run to think through carefully what you are trying to achieve from your screencast:

  • If your screencast is going to be used for reference, then a demo is probably all you need (“show me”).
  • If you’re looking to build competence, then have the user interact with the simulated software (“try me”).
  • If you need to measure competence, then build in an assessment (“test me”).

Also consider the topic for your screencast. Don’t bother teaching functionality which is pretty obvious anyway – concentrate on those tasks which you know users are having trouble with. And rather than talking about the functionality in abstract, much better to tell a story, to demonstrate how the software is used to solve real world problems.
Reference information is best kept short and sweet. If you have four aspects of a system to describe, create four screencasts. If you really do need to build a more elaborate piece of content, then make sure you add a menu that enables users to get to the information they want without delay (but remember menus are of no use if you are exporting to video).

Scripting

The more elaborate your screencast becomes, particularly in terms of interactivity, the more you will benefit from designing it in detail before you commence production, and that is likely to include a script for the narration. As ever, the key to success here is making sure the narration comes over as natural and conversational. Much of that is in the writing (write for the spoken voice, not for the screen) and the editing (try reading it aloud and if this causes you any difficulty,  keep working on it), but delivery counts too. Not everyone will come over well as  a narrator. If, even with practice, you can’t deliver the script confidently and convincingly, ask someone else to help or, best of all, hire a professional.

Recording

With an online tool, you record the whole screencast in one take. If you make a mistake, you have to start again. With desktop tools, you are under much less pressure. You can record your demos piece by piece and assemble them together later. Mistakes can easily be edited out.
However, you still have to make some major decisions like the size of the capture window. Be mindful of the device and the software your audience will be using to view your screencast – if necessary focus in on a small area of the application.

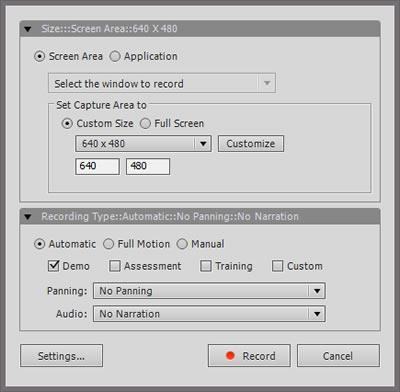
Camtasia record options
Recording options in Camtasia

Captivate record dialog
The dialog for setting recording options in Captivate

Editing

Here’s where desktop tools come into their own. You’ll find that just about any aspect of your screencast can be changed to suit your requirements. You can supplement your recordings with titles, menus, captions, highlights, interactions and much more.

Editing in Camtasia
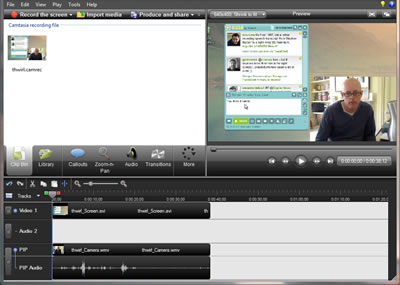
Camtasia provides much of the functionality of a full-blown video editor

Don’t rely on your own judgement. Test every aspect of your screencast out with colleagues or, better still, typical users, at each step in development. Don’t get precious about sticking to your original design – what matters here is that it works!
This guide is now also available as a PDF download
Take a look at our other practical guides
Coming next: A practical guide to creating learning scenarios
 

A practical guide to creating learning screencasts: part 2 – creating all-in-one-take screencasts

Practical guides
In part 1 of this guide, we looked at the arguments for screencasting and the two main types of tools – online, all-in-one-take and fully-featured desktop applications. In part 2 we take a look at the former.

Choose a tool

There are plenty of free online screencasting tool – you’ll find plenty listed in Jane Hart’s Directory of Learning Tools. To get your search started, you could do worse than take a look at screenr, screenjelly and screencast-o-matic.

Why use an online tool?

Here are some arguments for going the online route:

  • If they’re not free, then they’re certainly inexpensive.
  • You don’t have to download an install yet another desktop application.
  • They come with all sorts of nifty connections to other online tools, particularly social media.
  • The tools come with very basic functionality, so you’ll be up-and-running in minutes and won’t spend ages tinkering.

As you probably guessed, there are some drawbacks:

  • There may be some security issues having your organisation’s applications and sites shared online.
  • You need good internet connectivity.
  • Because you only get the one take and can’t edit your work or add extra functionality, you may not be able to achieve all you want.
  • If the vendor goes bust, bang goes your content (assuming you haven’t downloaded copies).

Choose your topic

All-in-one-take screencasts make great resources for just-in-time use or as elements in a blended offering. They need to be short (under 5 minutes) and highly practical. Don’t just work through all the functions in your application or on your site, regardless of whether anyone’s interested – describe how to do something really useful and not obvious. Everyone loves practical tools and tips.

Prepare

You’ll want to think through carefully what you want to show and how. If necessary, practise a few times until you feel confident that you can perform the task fluently. In most cases best advice would be not to script – the best screencasts are simple and conversational in tone. If you really must script, then edit the words carefully to make sure they sound completely natural.

The instructions won't take long to read!

Setting up

Typically you will be asked to select the area of the screen that you want to capture or to pick one of a range of standard sizes. Remember that the screencast is likely to be viewed at less than the original size, perhaps much less if on a smart phone, so focus in on what’s really relevant. A few tests should help you to find the most appropriate arrangement.
If you have more than one microphone on your system, then you’ll have to specify which one you want to use. As with all audio, quality does count – if you have a quality mic (ideally with a pop shield) then use it. If not, use what you have, but try to ensure there’s not a lot of background noise.

The screenr toolbar is typical of all these tools. You can set the capture dimensions, choose your mic and then start, pause and stop the recording.

Record

First, briefly introduce yourself and explain what it is you will be showing and why viewers will find this useful. Then commence your live performance (no pressure then), pausing where necessary. If you make minor stumbles, don’t stop, because chances are no-one will notice or care. Obviously if you make a complete hash, there’s no problem in starting again.

Sharing

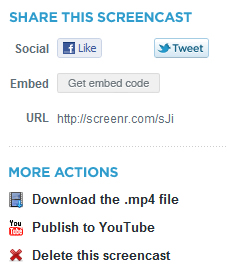
Screenr allows you to share your screencast in a number of ways or download to use locally

Depending on the tool, you’re likely to have plenty of ways to share your screencast:

  • Provide a link in an email, tweet, blog post or forum post or on your intranet, web site or LMS. The user will be taken to the vendor’s website to see the screencast.
  • Alternatively play the screencast directly in a web or forum posting or  on a web page by embedding the HTML code supplied by the vendor.
  • Download the screencast as a video. You can then upload it to your website, intranet or LMS, or send it out as an email attachment.
  • Publish the video on YouTube.

Coming in part 3: Using more sophisticated desktop tools.